[Flutter] FCM - Push Notification
1. Firabase Setting
https://console.firebase.google.com/
로그인 - Google 계정
이메일 또는 휴대전화
accounts.google.com
상단의 링크로 접속하여, 우선적으로 프로젝트를 추가해주도록 합니다.
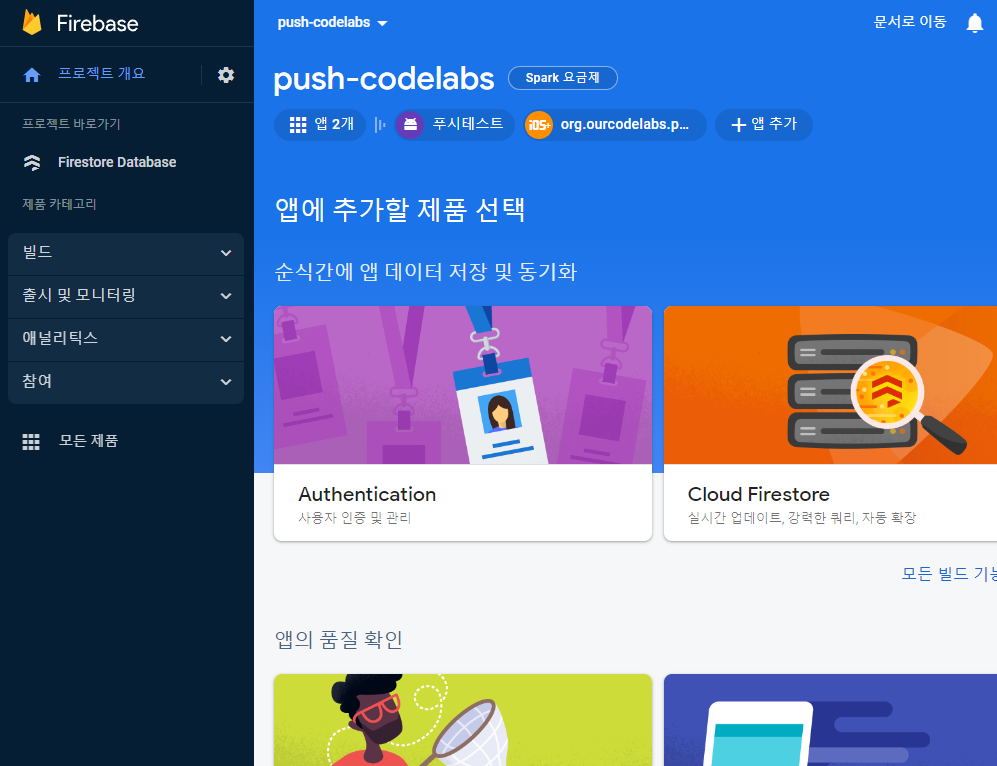
프로젝트 개요로 넘어가시게되면, 상단에 앱추가 버튼을 클릭해주도록 합니다.
거기서 Android 를 추가해주겠습니다.
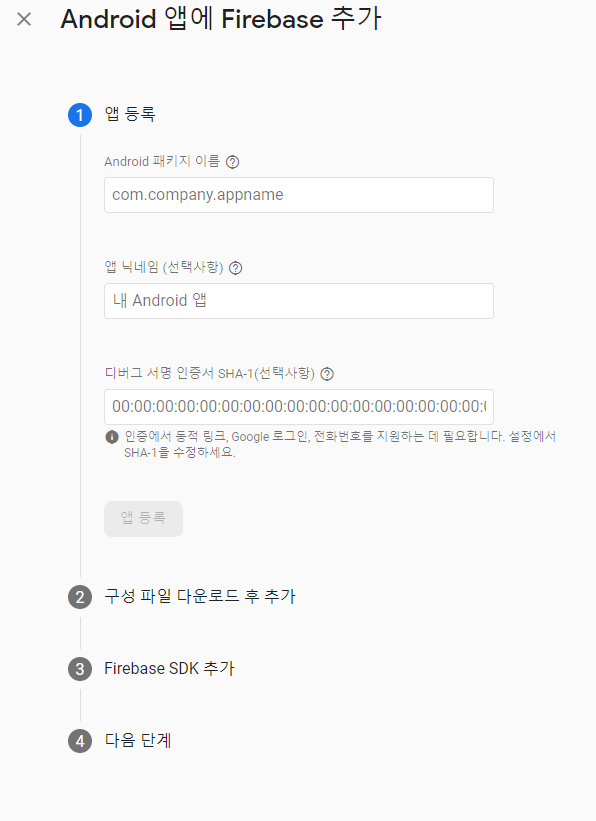
이런 화면이 등장합니다. SHA-1 키는 선택사항이지만 미리 해두시는걸 추천드립니다.
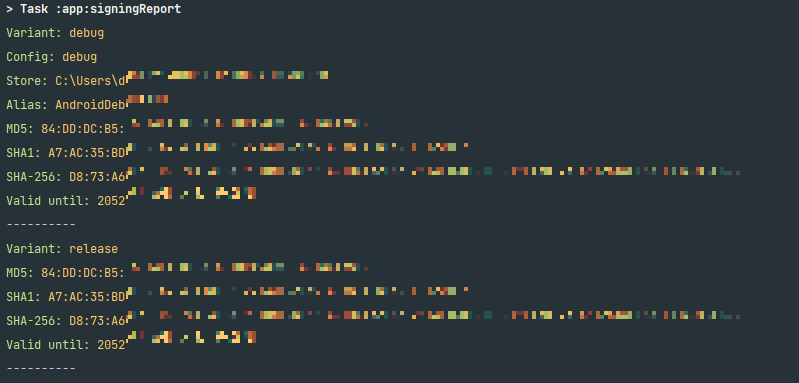
* 앱의 SHA-1 코드값을 얻기위해, 별도의 코딩을 MainActivity 에 작성하는 경우가 있는데,
이보다 훨씬 더 효율적인 방법으로는 Gradle을 이용하는것입니다.
flutter project중 android 폴더로 terminal 에서 접근해주도록 합니다.
./gradlew signingReport
위의 명령어를 통해 아래와 같은 결과값을 손쉽게 얻으실 수 있습니다.
이후는 Google firebase에서 제공하는 가이드라인대로 진행해주시면 됩니다.
2. 예제와 구현
아래에서는 주석으로 설명된, 예제 코드와 함께 소스환경 세팅을 하도록 하겠습니다.
-Android 세팅
[android / app / src / main / AndroidManifest.xml]
<manifest
    ...
    <uses-permission android:name="android.permission.INTERNET"/>
    <uses-permission android:name="android.permission.RECEIVE_BOOT_COMPLETED"/>
    <uses-permission android:name="android.permission.VIBRATE" />
    <uses-permission android:name="android.permission.WAKE_LOCK" />
    <uses-permission android:name="android.permission.USE_FULL_SCREEN_INTENT" />
<application
	...
    <meta-data
            android:name="com.google.firebase.messaging.default_notification_channel_id"
            android:value="important_channel" />
[android / build.gradle]
dependencies {
        classpath 'com.android.tools.build:gradle:4.1.0'
        classpath 'com.google.gms:google-services:4.3.10'
    }
[android / app / build.gradle]
apply plugin: 'com.google.gms.google-services'android {
// compileSdkVersion flutter.compileSdkVersion
compileSdkVersion 33
...defaultConfig {
// TODO: Specify your own unique Application ID (https://developer.android.com/studio/build/application-id.html).
applicationId "org.ourcodelabs.pushandselfauth"
// You can update the following values to match your application needs.
// For more information, see: https://docs.flutter.dev/deployment/android#reviewing-the-build-configuration.
// minSdkVersion flutter.minSdkVersion
minSdkVersion 19
...dependencies {
...
// Import the Firebase BoM
implementation platform('com.google.firebase:firebase-bom:30.2.0')
// Add the dependency for the Firebase SDK for Google Analytics
// When using the BoM, don't specify versions in Firebase dependencies
implementation 'com.google.firebase:firebase-analytics'
}
- iOS / APNs Setting
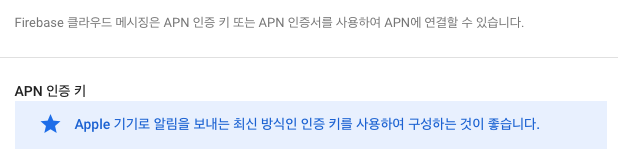
iOS 에서 FCM을 이용하기 위해서는 인증서 또는 인증키를 발급해야 사용할 수 있습니다.
Firebase 에서도 최신 방식인 인증키를 사용하여 구성하는걸 추천한다고 합니다.

apple developer 에 들어가서 Keys + 버튼 클릭.
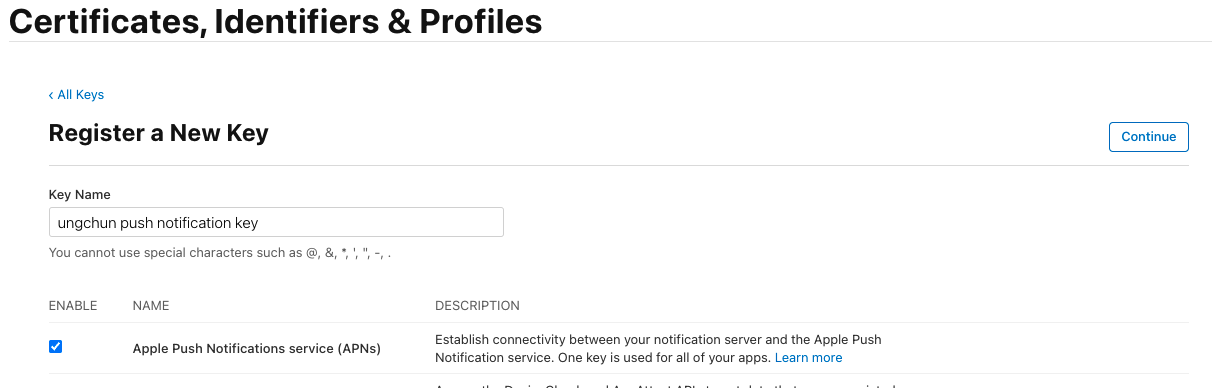
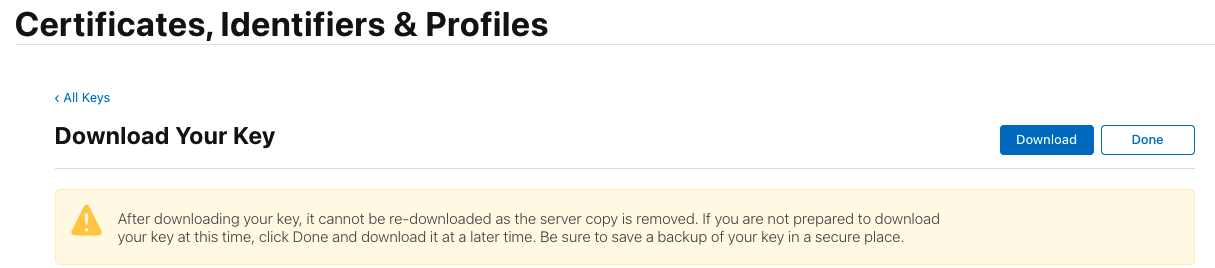
키를 다운로드 합니다. 한번 다운로드 받으면 다시 다운받을 수 없습니다. 잘 보관해주세요.
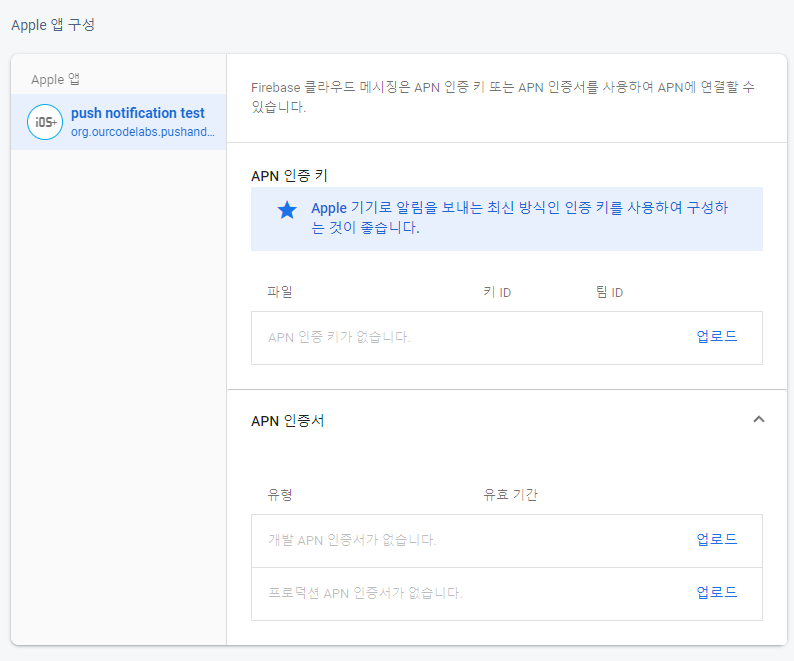
다운받은 키를 Firebase -> 프로젝트 설정 -> 클라우드 메시징 -> apple 앱 구성에 등록
-FCM 라이브러리 추가
flutter pub add firebase_messaging
-Flutter 포어그라운드 수신 메세지 출력을 위한 라이브러리 추가
flutter pub add flutter_local_notifications
-GetX Library 추가
flutter pub add get
-FCM 토큰을 얻기위한 키값 생성
Firebase 콘솔 -> 해당 프로젝트 -> 프로젝트 설정 -> '클라우드 메시징' 탭 -> 하단의 웹 구성에서 웹 푸시 인증서 생성 -> 키 복사
[main.dart]
/**
 * iOS 권한을 요청하는 함수
 */
Future reqIOSPermission(FirebaseMessaging fbMsg) async {
  NotificationSettings settings = await fbMsg.requestPermission(
    alert: true,
    announcement: false,
    badge: true,
    carPlay: false,
    criticalAlert: false,
    provisional: false,
    sound: true,
  );
}

/**
 * Firebase Background Messaging 핸들러
 */
Future<void> fbMsgBackgroundHandler(RemoteMessage message) async {
  print("[FCM - Background] MESSAGE : ${message.messageId}");
}

/**
 * Firebase Foreground Messaging 핸들러
 */
Future<void> fbMsgForegroundHandler(
    RemoteMessage message,
    FlutterLocalNotificationsPlugin flutterLocalNotificationsPlugin,
    AndroidNotificationChannel? channel) async {
  print('[FCM - Foreground] MESSAGE : ${message.data}');

  if (message.notification != null) {
    print('Message also contained a notification: ${message.notification}');
    flutterLocalNotificationsPlugin.show(
        message.hashCode,
        message.notification?.title,
        message.notification?.body,
        NotificationDetails(
            android: AndroidNotificationDetails(
              channel!.id,
              channel.name,
              channelDescription: channel.description,
              icon: '@mipmap/ic_launcher',
            ),
            iOS: const DarwinNotificationDetails(
              badgeNumber: 1,
              subtitle: 'the subtitle',
              sound: 'slow_spring_board.aiff',
            )));
  }
}

/**
 * FCM 메시지 클릭 이벤트 정의
 */
Future<void> setupInteractedMessage(FirebaseMessaging fbMsg) async {
  RemoteMessage? initialMessage = await fbMsg.getInitialMessage();
  // 종료상태에서 클릭한 푸시 알림 메세지 핸들링
  if (initialMessage != null) clickMessageEvent(initialMessage);
  // 앱이 백그라운드 상태에서 푸시 알림 클릭 하여 열릴 경우 메세지 스트림을 통해 처리
  FirebaseMessaging.onMessageOpenedApp.listen(clickMessageEvent);
}
void clickMessageEvent(RemoteMessage message) {
  print('message : ${message.notification!.title}');
  Get.toNamed('/');
}

void main() async {
  WidgetsFlutterBinding.ensureInitialized(); // 바인딩
  await Firebase.initializeApp();
  FirebaseMessaging fbMsg = FirebaseMessaging.instance;

  String? fcmToken = await fbMsg.getToken(
      vapidKey:
          "BGRA_GV..........keyvalue");
  //TODO : 서버에 해당 토큰을 저장하는 로직 구현

  //FCM 토큰은 사용자가 앱을 삭제, 재설치 및 데이터제거를 하게되면 기존의 토큰은 효력이 없고 새로운 토큰이 발금된다.
  fbMsg.onTokenRefresh.listen((nToken) {
    //TODO : 서버에 해당 토큰을 저장하는 로직 구현
  });
  runApp(const MyApp());

  // 플랫폼 확인후 권한요청 및 Flutter Local Notification Plugin 설정
  FlutterLocalNotificationsPlugin flutterLocalNotificationsPlugin =
      FlutterLocalNotificationsPlugin();
  AndroidNotificationChannel? androidNotificationChannel;
  if (Platform.isIOS) {
    await reqIOSPermission(fbMsg);
  } else if (Platform.isAndroid) {
    //Android 8 (API 26) 이상부터는 채널설정이 필수.
    androidNotificationChannel = const AndroidNotificationChannel(
      'important_channel', // id
      'Important_Notifications', // name
      description: '중요도가 높은 알림을 위한 채널.',
      // description
      importance: Importance.high,
    );

    await flutterLocalNotificationsPlugin
        .resolvePlatformSpecificImplementation<
            AndroidFlutterLocalNotificationsPlugin>()
        ?.createNotificationChannel(androidNotificationChannel);
  }
  //Background Handling 백그라운드 메세지 핸들링
  FirebaseMessaging.onBackgroundMessage(fbMsgBackgroundHandler);
  //Foreground Handling 포어그라운드 메세지 핸들링
  FirebaseMessaging.onMessage.listen((message) {
    fbMsgForegroundHandler(message, flutterLocalNotificationsPlugin, androidNotificationChannel);
  });
  //Message Click Event Implement
  await setupInteractedMessage(fbMsg);
}
3. Firebase Message 직접 보내보기
Firebase 콘솔 -> 해당 프로젝트 -> 프로젝트 설정 -> 참여 -> Messaging
에 들어가보시면 일정한 새 캠페인을 만드시거나, 새 실험을 만들어 테스트 해보실 수 있습니다.
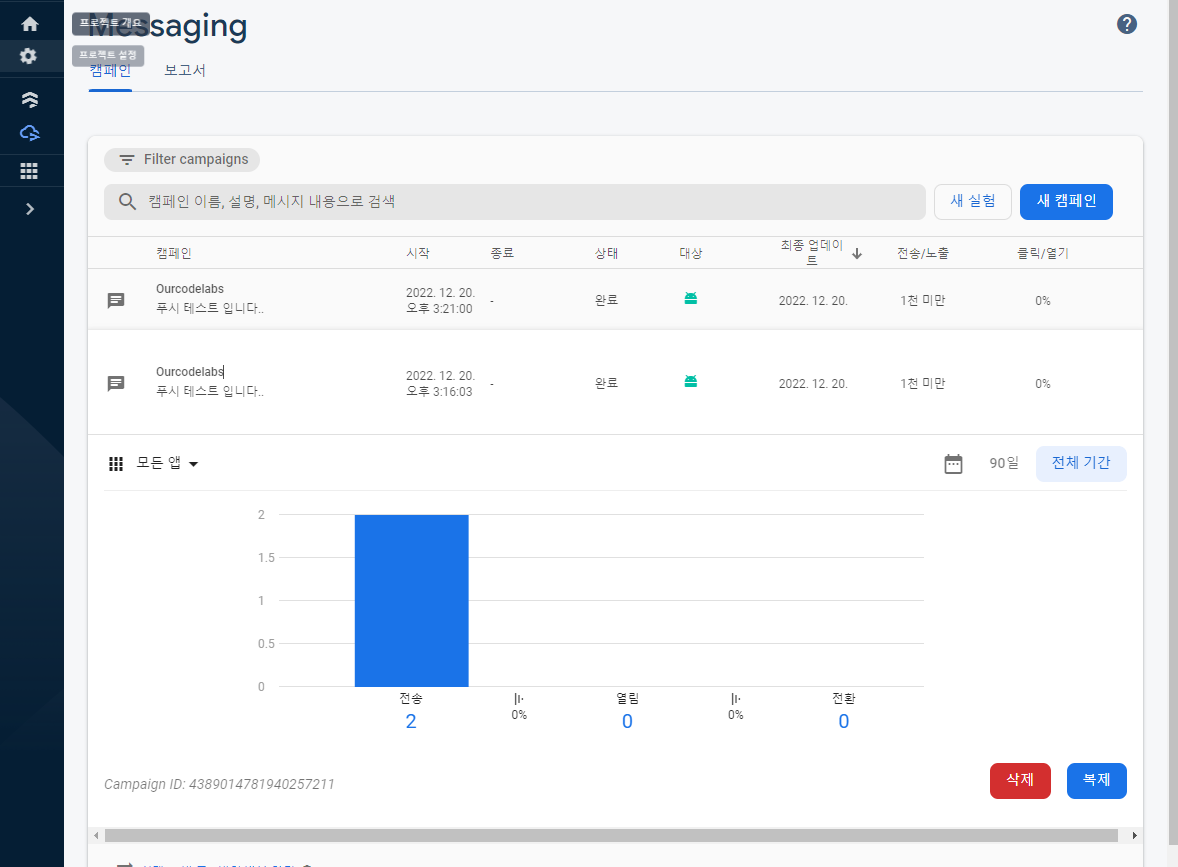
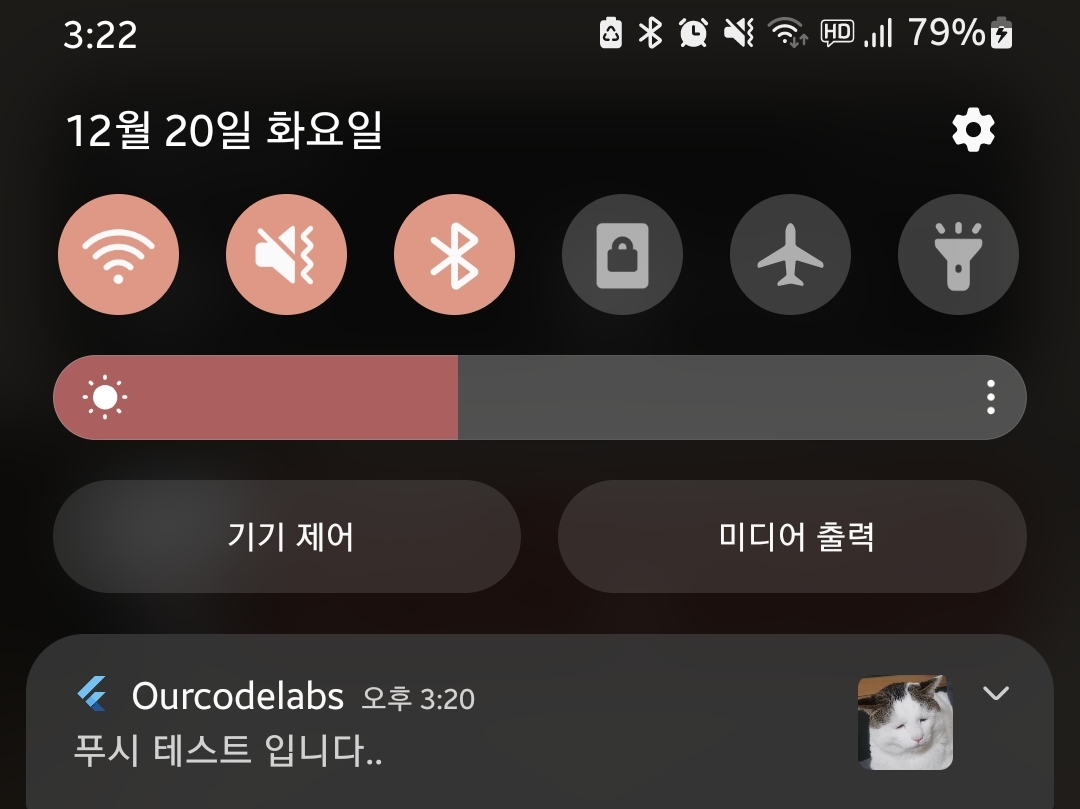
위와같이, 실 기기에 알림이 가는것을 확인하실 수 있습니다.
'App 개발관련 > flutter' 카테고리의 다른 글
| [TabBarView] WebView Scroll 가능하게 하는 방법 (0) | 2023.02.15 |
|---|---|
| [Flutter] SVG 이미지 사용하기 (0) | 2023.01.31 |
| [Flutter] iOS Apple Login 정책 가이드라인 준수 (0) | 2022.12.13 |
| [Flutter]Network 에 있는 Image 호출시 이미지 cache 문제해결 (0) | 2022.12.05 |
| [Flutter] webview_flutter 사용중 iOS alert, confirm 띄우기 (0) | 2022.12.05 |
