[Flutter]Kakao Login 구현
2022. 9. 14. 17:30
728x90
반응형
오늘은 오랜만에 flutter에서 kakao login 구현 부분을 정리해 봅니다.
kakao_flutter_sdk 인스톨 방법
flutter pub add kakao_flutter_sdk
Xcode SDK 추가 방법
Repository URL :
| https://github.com/kakao/kakao-ios-sdk |
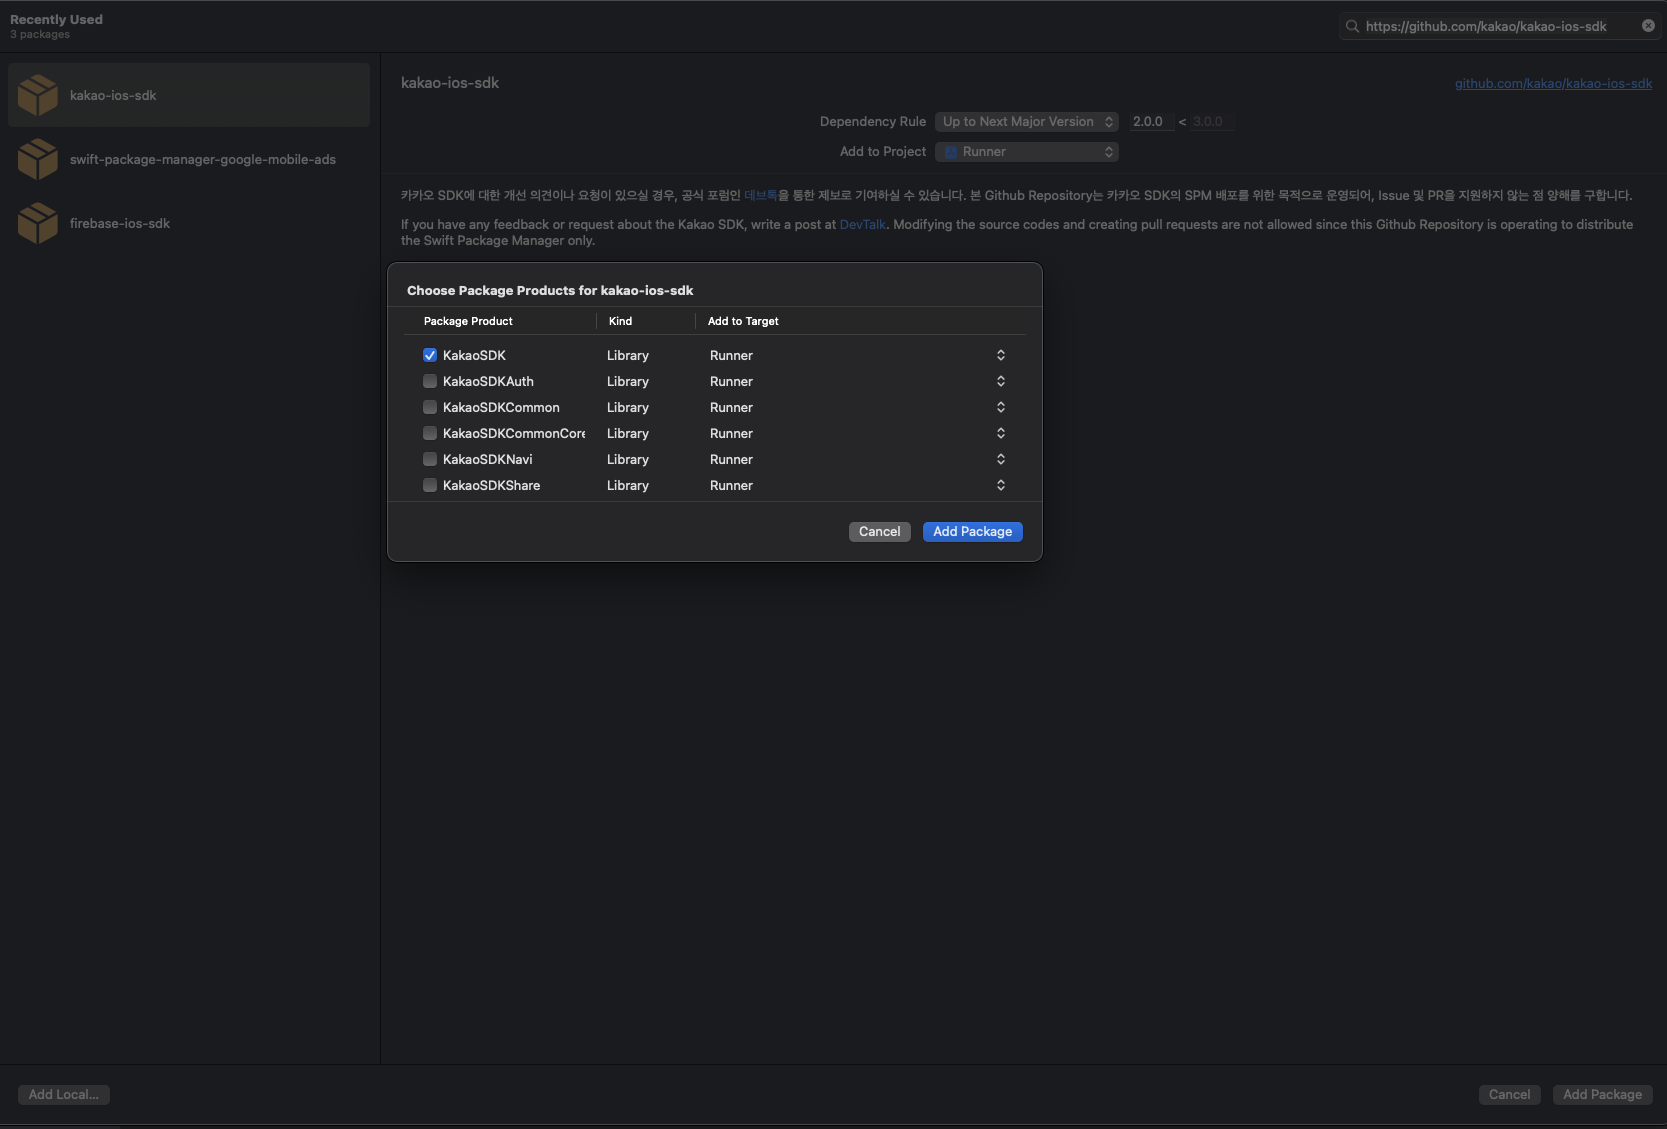
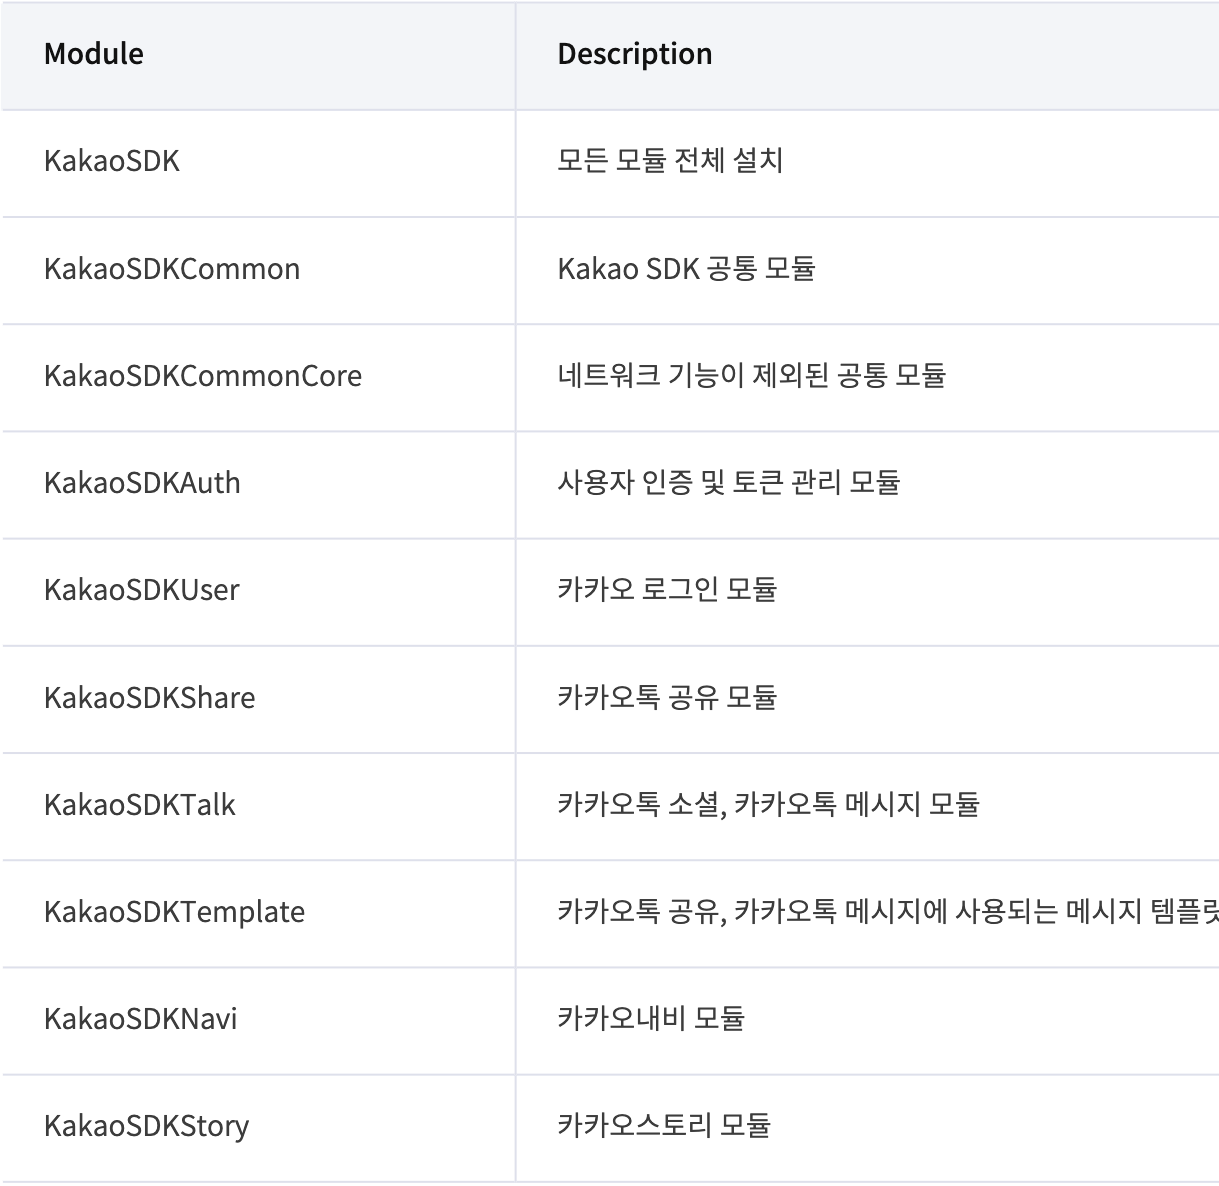
Module 선택
KakaoSDK 를 선택해 주시면 됩니다.
Info.plist 에 추가해야할 내용
<key>LSApplicationQueriesSchemes</key>
<array>
<!-- 카카오톡 로그인 -->
<string>kakaokompassauth</string>
<!-- 카카오톡 공유 -->
<string>kakaolink</string>
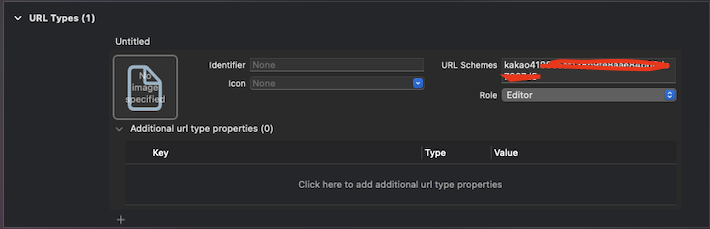
</array>URL Scheme 설정
URL Types 에 아래와 같이 추가 "kakao${NATIVE_APP_KEY}" 형식으로 추가해주시면 됩니다.
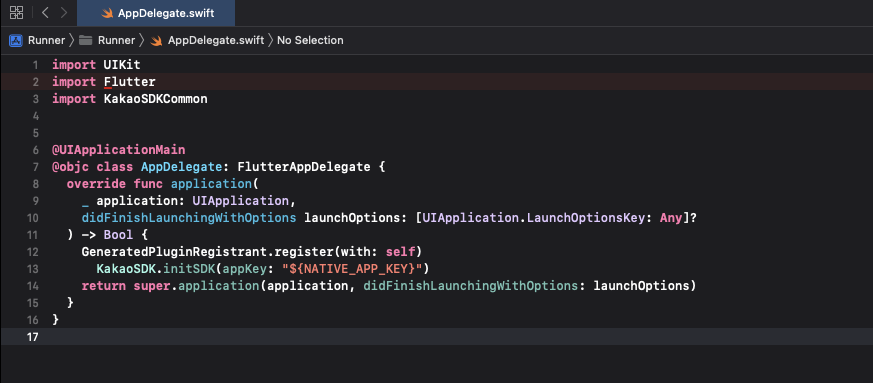
Swift 초기화
카카오로그인시 카카오계정(이메일)을 받아오려면 kakao developers 사이트에서 개인정보란에서 설정을 해줘야합니다.
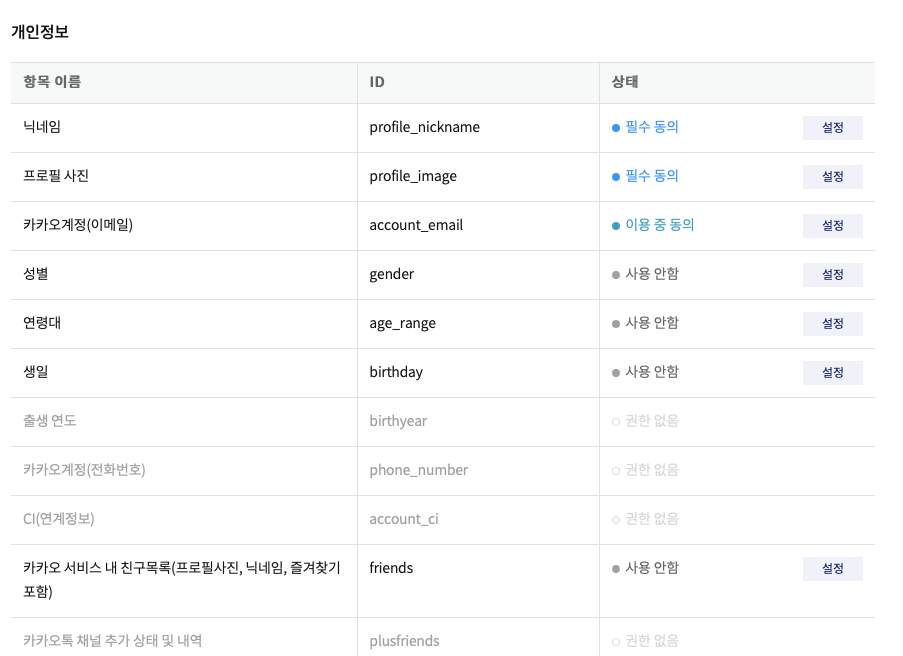
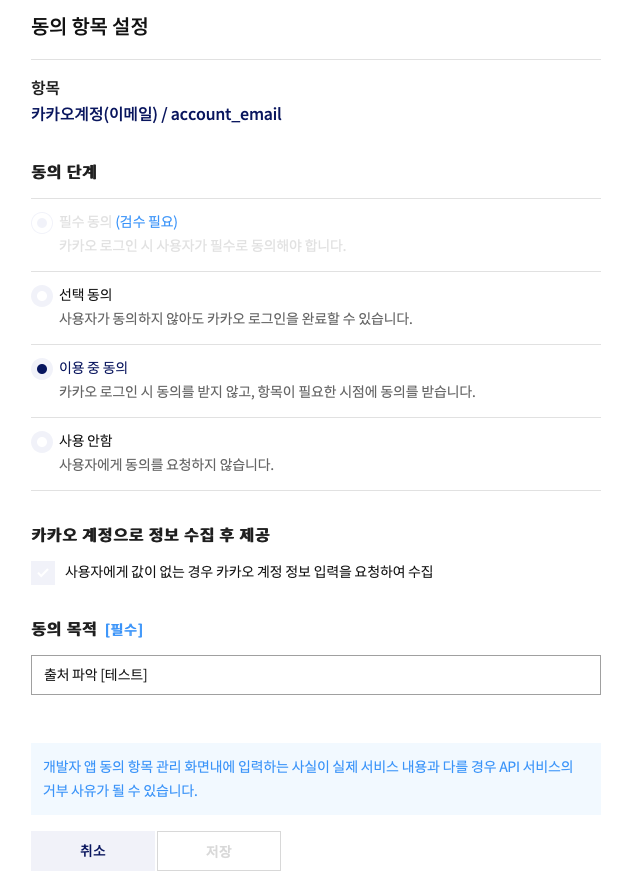
위와 같이 설정을 해야지 사용자의 이메일을 받고 처리를 할 수 있습니다.
Android hash key 생성방법
keytool -exportcert -alias androiddebugkey -keystore ~/.android/debug.keystore -storepass android -keypass android | openssl sha1 -binary | openssl base64위의 명령어를 "플러터프로젝트/android/app/" 경로에서 터미널로 실행시켜주시면 됩니다.
위의 -keystore 인자의 값으로 들어오는 경로는 Mac, Linux 기준이며 OS별로 상이 할 수 있습니다.
위의 명령어 실행 시
Warning:
인증서 uses the SHA1withRSA signature algorithm which is considered a security risk. This algorithm will be disabled in a future update.
JKS 키 저장소는 고유 형식을 사용합니다. "keytool -importkeystore -srckeystore /Users/jspman/.android/debug.keystore -destkeystore /Users/jspman/.android/debug.keystore -deststoretype pkcs12"를 사용하는 산업 표준 형식인 PKCS12로 이전하는 것이 좋습니
와 같은 경고 문구가 (무조건적인것은 아닙니다.) 뜨며, 아래에 해시 키 값이 생성되어 표출됩니다.
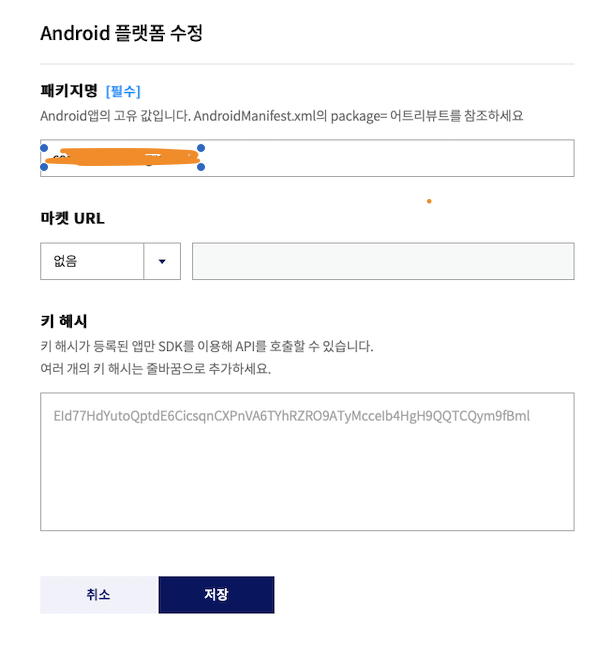
해당 키 값을 키 해시 항목에 기입해주시면 됩니다.
위의 해당 내용이 설정이 되면 개발하면서 진행하는것은 문제가 없네요.
import 'package:flutter/material.dart';
import 'package:flutter/services.dart';
import 'package:kakao_flutter_sdk/kakao_flutter_sdk.dart';
import 'dart:developer' as developer;

class Login extends StatelessWidget {
  const Login({Key? key}) : super(key: key);

  Future<dynamic> fn_loginWithKakaoAccount() async{
    try {
      OAuthToken token = await UserApi.instance.loginWithKakaoAccount();
      developer.log("token : "+token.toString());
      return token;
    } catch (e) {
      developer.log("로그인 실패 "+e.toString());

      return null;
    }
  }

  Future<void> fn_getAdditionalKakaoAccount() async{
    User user;
    try {
      user = await UserApi.instance.me();
    } catch (error) {
      print('사용자 정보 요청 실패 $error');
      return;
    }

    List<String> scopes = [];

    if (user.kakaoAccount?.emailNeedsAgreement == true) {
      scopes.add('account_email');
    }
    if (user.kakaoAccount?.birthdayNeedsAgreement == true) {
      scopes.add("birthday");
    }
    if (user.kakaoAccount?.birthyearNeedsAgreement == true) {
      scopes.add("birthyear");
    }
    if (user.kakaoAccount?.ciNeedsAgreement == true) {
      scopes.add("account_ci");
    }
    if (user.kakaoAccount?.phoneNumberNeedsAgreement == true) {
      scopes.add("phone_number");
    }
    if (user.kakaoAccount?.profileNeedsAgreement == true) {
      scopes.add("profile");
    }
    if (user.kakaoAccount?.ageRangeNeedsAgreement == true) {
      scopes.add("age_range");
    }

    if (scopes.length > 0) {
      print('사용자에게 추가 동의 받아야 하는 항목이 있습니다');

      // OpenID Connect 사용 시
      // scope 목록에 "openid" 문자열을 추가하고 요청해야 함
      // 해당 문자열을 포함하지 않은 경우, ID 토큰이 재발급되지 않음
      // scopes.add("openid")

      //scope 목록을 전달하여 카카오 로그인 요청
      OAuthToken token;
      try {
        token = await UserApi.instance.loginWithNewScopes(scopes);
        print('현재 사용자가 동의한 동의 항목: ${token.scopes}');
      } catch (error) {
        print('추가 동의 요청 실패 $error');
        return;
      }

      // 사용자 정보 재요청
      try {
        User user = await UserApi.instance.me();
        print('사용자 정보 요청 성공'
            '\n회원번호: ${user.id}'
            '\n닉네임: ${user.kakaoAccount?.profile?.nickname}'
            '\n이메일: ${user.kakaoAccount?.email}');
      } catch (error) {
        print('사용자 정보 요청 실패 $error');
      }
    }
  }

  Future<void> fn_kakaoLogin() async{
    // 카카오 로그인 구현 예제
   print("button click");
// 카카오톡 설치 여부 확인
// 카카오톡이 설치되어 있으면 카카오톡으로 로그인, 아니면 카카오계정으로 로그인
    if (await isKakaoTalkInstalled()) {
      try {
        await UserApi.instance.loginWithKakaoTalk();
        print('카카오톡으로 로그인 성공');
      } catch (error) {
        print('카카오톡으로 로그인 실패 $error');

        // 사용자가 카카오톡 설치 후 디바이스 권한 요청 화면에서 로그인을 취소한 경우,
        // 의도적인 로그인 취소로 보고 카카오계정으로 로그인 시도 없이 로그인 취소로 처리 (예: 뒤로 가기)
        if (error is PlatformException && error.code == 'CANCELED') {
          return;
        }
        // 카카오톡에 연결된 카카오계정이 없는 경우, 카카오계정으로 로그인
        try {
          await UserApi.instance.loginWithKakaoAccount();
          print('카카오계정으로 로그인 성공');
        } catch (error) {
          print('카카오계정으로 로그인 실패 $error');
        }
      }
    } else {
      try {
        await UserApi.instance.loginWithKakaoAccount();
        print('카카오계정으로 로그인 성공');
      } catch (error) {
        print('카카오계정으로 로그인 실패 $error');
      }
    }
  }

  @override
  Widget build(BuildContext context) {
    return Container(
      child: ElevatedButton(
        style: ElevatedButton.styleFrom(
            padding: EdgeInsets.all(10)),
        child: const Text('kakao 로그인'),
        onPressed: () async{
          try {
            AccessTokenInfo tokenInfo = await UserApi.instance.accessTokenInfo();
            print('이미 액세스 토큰이 존재하므로 로그인을 시도하지 않습니다.');

            User user = await UserApi.instance.me();
            print('사용자 정보 요청 성공'
                '\n회원번호: ${user.id}'
                '\n닉네임: ${user.kakaoAccount?.profile?.nickname}'
                '\n이메일: ${user.kakaoAccount?.email}');
          } catch (error) {
            print('액세스 토큰이 존재하지 않습니다. 로그인을 시도합니다.');
            OAuthToken token = await fn_loginWithKakaoAccount();
            User user = await UserApi.instance.me();
            if(token != null) {
              print('사용자 정보 요청 성공'
                  '\n회원번호: ${user.id}'
                  '\n닉네임: ${user.kakaoAccount?.profile?.nickname}'
                  '\n이메일: ${user.kakaoAccount?.email}');
            }
          }

        },
      ));
  }


}
실행화면


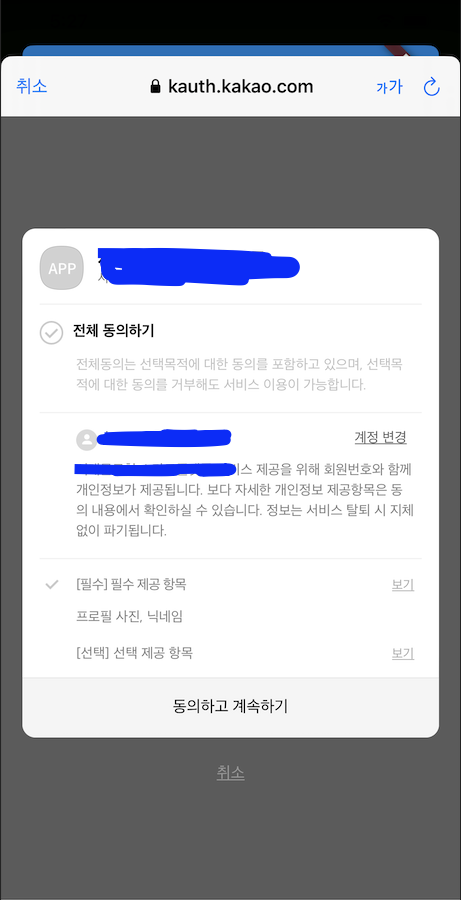
위와 같이 화면이 뜨고 카카오톡으로 회원가입이 가능합니다. ^^
728x90
'App 개발관련 > flutter' 카테고리의 다른 글
| [Flutter] Google Login - Android 구현 (0) | 2022.09.16 |
|---|---|
| [Xcode + Flutter ] Naver Login IOS 구현 (1) | 2022.09.16 |
| [Kakao SDK 오류] 'kakao_flutter_sdk_common/kakao_flutter_sdk_common-Swift.h' file not found (0) | 2022.09.14 |
| [Polygon Testnet] MetaMask 지갑과 연결하는 방법 (0) | 2022.06.29 |
| [Flutter] url_launcher 사용 방법 및 오류해결 (0) | 2022.06.14 |
